Save for our WNC Repair Cafe project, and a handful of appropriate technology workshops, we’ve been pretty quiet over here at the biochar facility for a little while now. Lately, most of our work has centered on upgrading the liquid components of our method of biochar production: we’re going deeper with our research in wood vinegar and biochar applications and improving processes with clean combustion of pyrolysis oil, and all the while developing some innovative small scale waste management tools. As a result, our work has led us down some deep rabbit holes, but so is the work of understanding the circular economy: processes are often dependent on the resources of other processes. For example, what started as a standalone project in carbonizing wild grown, (surprisingly robust) black walnut shells for a friend at the Nutty Buddy Collective, became the catalyst for experimentation as biochar for grow media in aquaponics systems. After neutralizing pH by soaking the charred shells in a wood vinegar solution, we were able to start a biofilter with the addition of pond microbes and common store-bought ammonia. In the fall, we’ll move our 55 gallon drum system into our climate controlled black soldier fly composting chamber, where high protein fish feed is grown just a few feet away on tubs of restaurant food waste. Admittedly, we’ve still got a lot to learn.
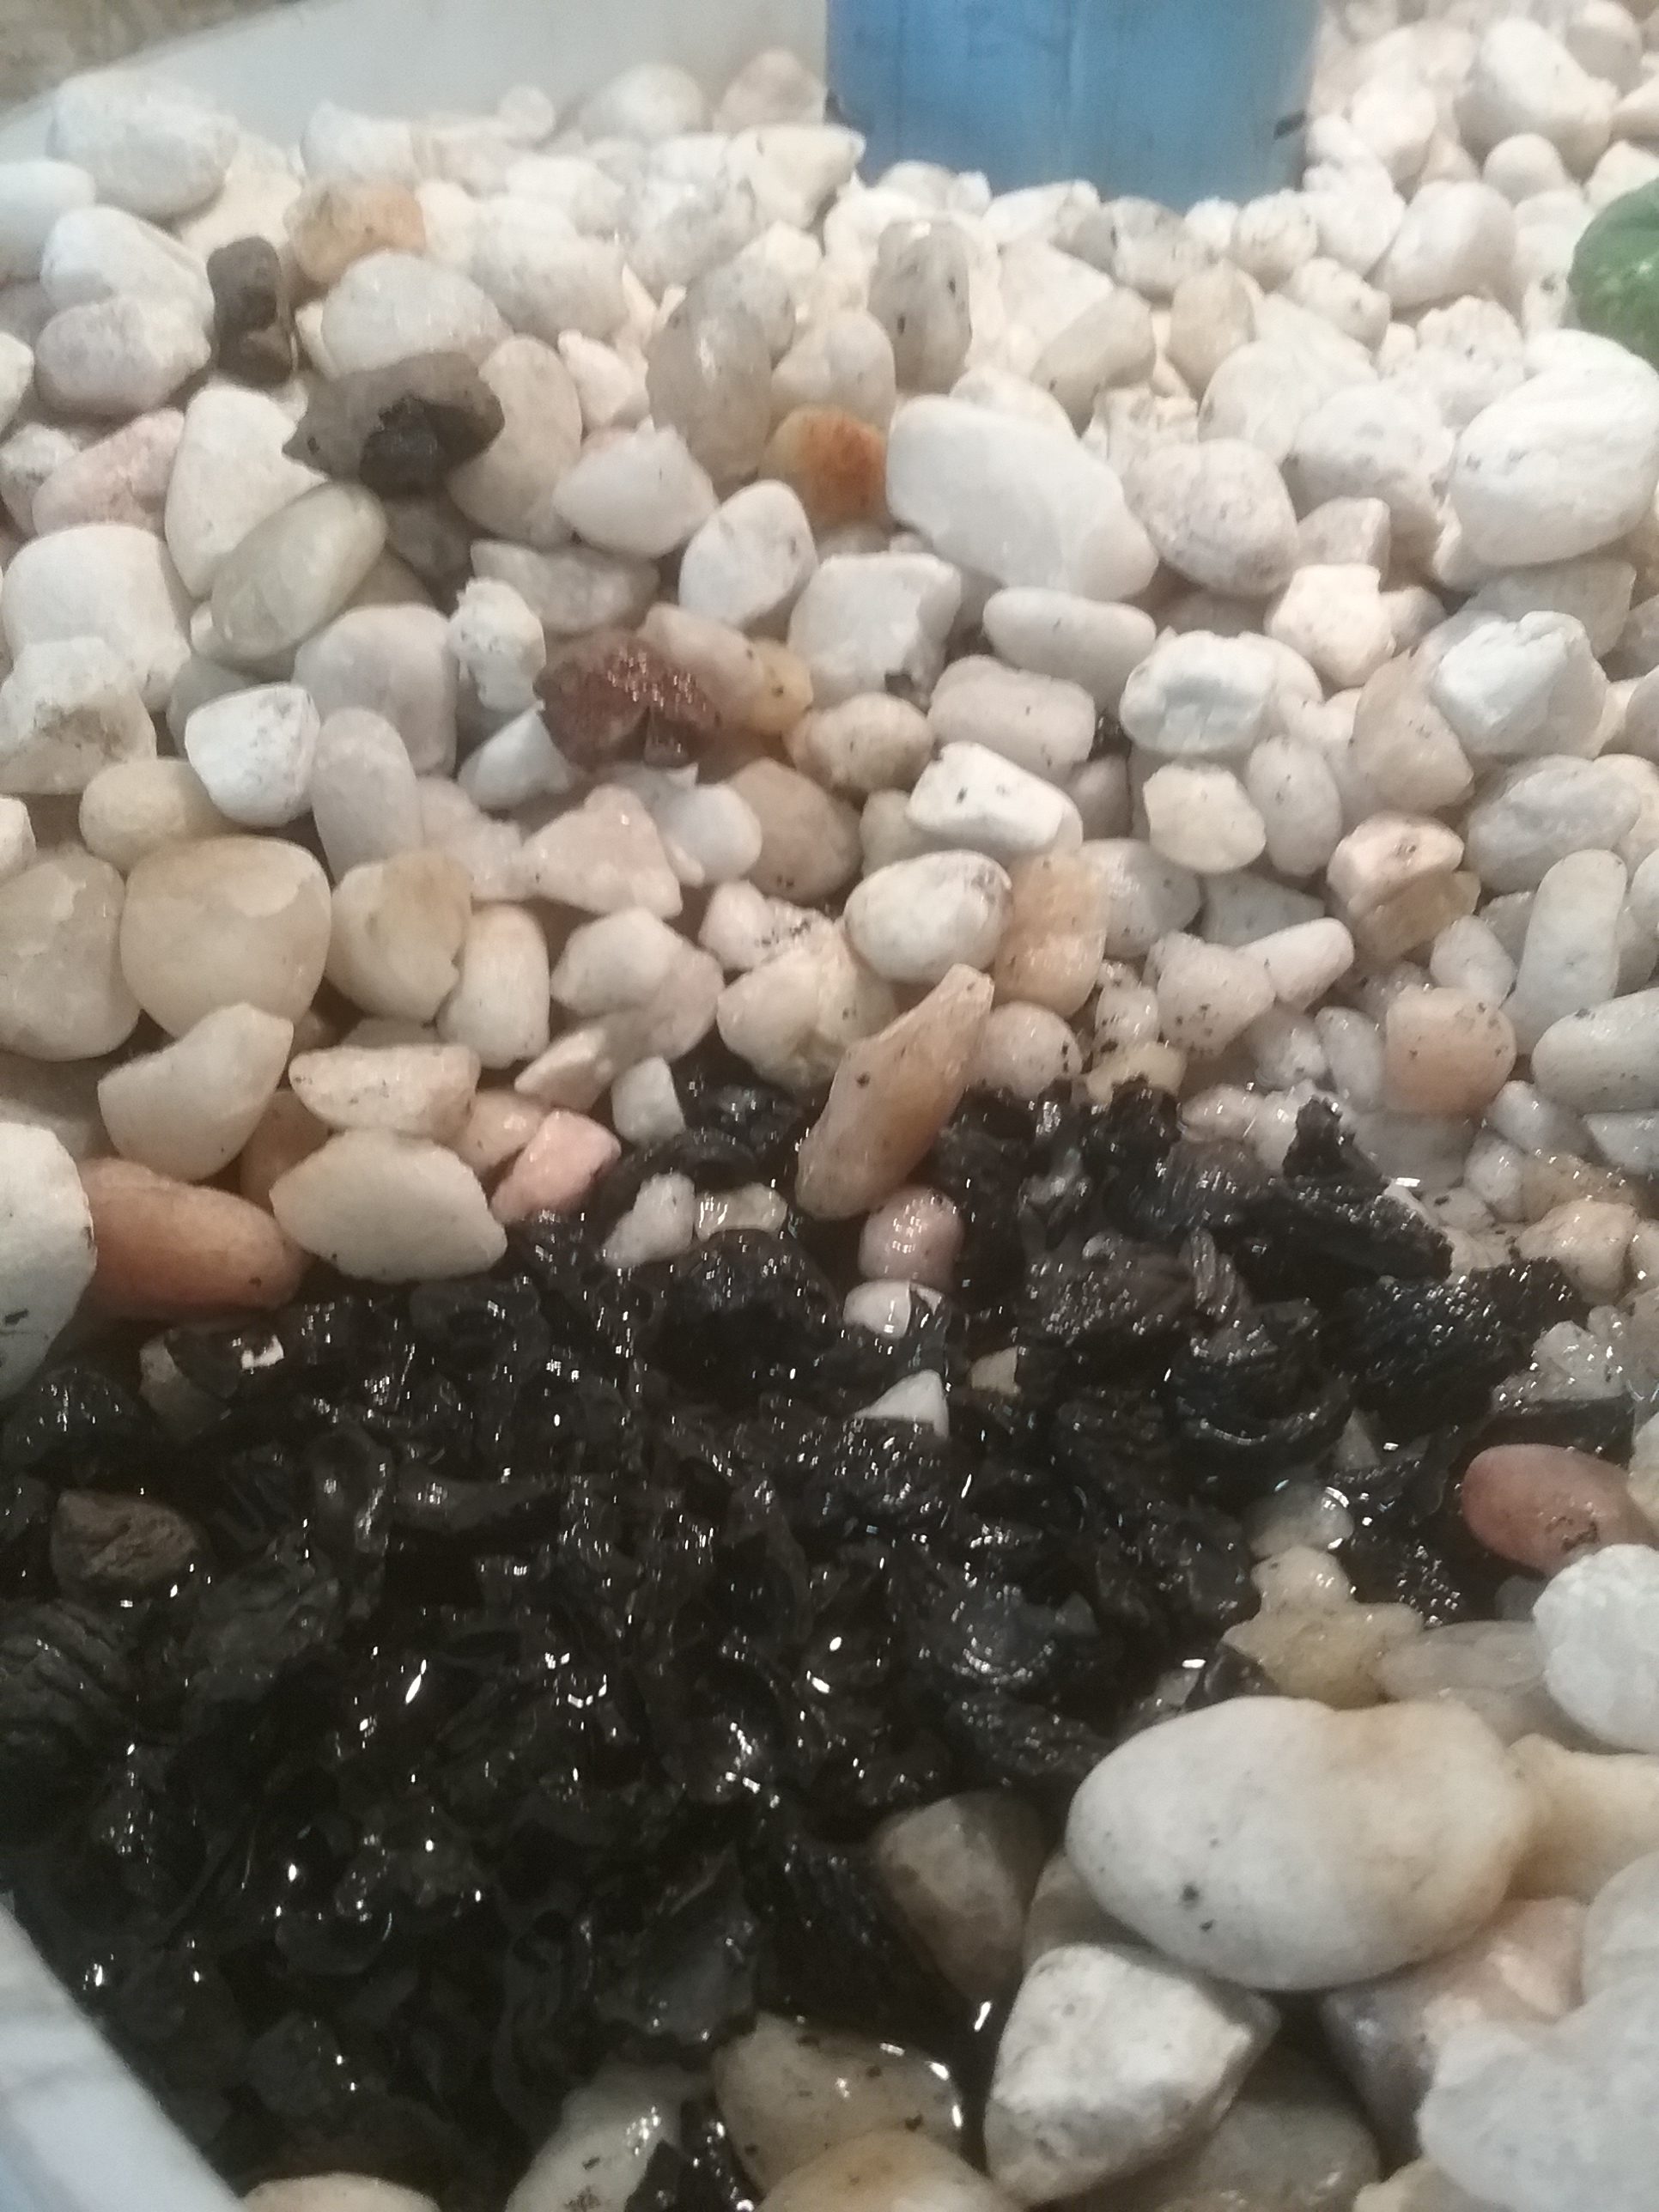
Carbonized wild-grown walnut shells are not easily broken down into smaller pieces: it’s for this reason, along with biochar’s characteristic high porosity and natural resistance to decay, that we expect make it an outstanding grow media in aquaponics systems. Currently there are just 6 fingerling tilapia and 10” of walnut shell char under 2” of river pebbles in our not yet mature aquaponics system.
Checking in on the Production Facility
If you’ve been following our work in biochar production, then you know that for five years the biochar crew at Living Web Farms has been operating a batch retort system with condensate and process heat recovery. After starting our work in 2013 we have produced at least 800 yards of high quality crushed carbon-negative biochar. Since then, system developer Bob Wells has gone on to continue his work with New England Biochar, while Jon Nilsson has nurtured Chargrow LLC: a western NC developer of value-added biochar products. Nowadays, all of the biochar produced at Living Web Farms is reserved for use on our farms, either rehabilitating soils or as a component of a very wide range of new trials.
We get a fair amount of questions from all over the world regarding small scale production, with a high percentage of those questions about the tin man method described by Bob Wells in the How to Make Biochar video from 2013. In her last post, Meredith introduced the Q+A format to the blog. I like this idea, and thought sharing some details about the tin man method might help clear the air (metaphorically, and literally). For the remainder of this post, I’ll show some details on tin-man construction, a little bit about operation and troubleshooting, and then I’ll go on to introduce a few other do-it-yourself methods that each have their own advantages.
Tin Man Q+A
The “tin-man” or “55/30” retort consists of two fairly common 55 and 30 gallon steel drums nested in each other. Holes are drilled or punched at distinct locations in each of the drums. The inner drum is packed tightly (but not too tightly!) with wood chunks or sticks, up to 1” in diameter. The outer drum is packed with similar material, lit on top and then closed up with a vented lid. When all assembled the flue pipe stands up proud off the drum lid, step back, and with a stretch of the imagination it resembles the Tin Man from Oz. If you’ve watched the video and have remaining questions on Tin-man construction, then please, scroll through the following slideshow.
[tribulant_slideshow gallery_id=”5″]
Operating the Tin-Man
When woody biomass is heated in the absence of oxygen, two simultaneous processes are set into motion: pyrolysis and carbonization. Volatile gases are driven out (pyrolysis) while what organic material remains is carbonized into biochar. These volatile gases are burned when allowed to mix with a proper ratio of ‘secondary’ air. Gas escapes from holes in the inner drum, while air makes it way into the system via two sets of holes on the outside drum. These holes in the drums each serve a specific function in this process.
- The holes along the bottom of the inside drum allow pyrolysis gasses to escape, but limit the amount of the oxygen that can go in. These holes are very important! Do not apply heat to a completely sealed drum!
- The holes along the bottom of the outside drum are for “primary” air: that which provides oxygen for sustaining the burn in the space between the drums. Think of this as the ‘fuel’ when determining your fuel/gas ratio. In general, more air is necessary here in the beginning of the batch process, but may become a problem later if things become excessively smoky.
- The holes along the top of the outside drum are for “secondary” air: providing oxygen to the fuel rich gas coming from below. After the process gets going, the space between the top of the two drums becomes a mixing zone, facilitating maximum combustion before exiting through the flue pipe.
In my experience: I have not yet been able to run a Tin-Man without adjusting air inlet at some point during the process. Fuel rich dark smoke indicates inadequate combustion – this common problem is almost always helped by adding more secondary air to the mix by carefully cracking the lid of the outer drum. White colored wispy smoke may indicate the temperature is too low – possibly due to too much secondary air, or inadequate primary air, or the wood isn’t dry enough. Moisture is a huge factor in all biomass systems – it takes a lot of energy to vaporize water – energy that is otherwise available to raise the combustion temperature. It’s also important to pack the space between the two drums with enough combustible material to sustain throughout the entire process.
How big do I make my holes?
Unfortunately, there’s no good answer for this. You can use our hole spacing (outlined in the slideshow above) as a starting point. But herein lies the catch: (for the most part) the tin-man is a batch system. What I mean here is the whole batch of woody biomass in the inner drum is (mostly) heated evenly. As wood heats up, its constituent parts: cellulose, hemicellulose, and lignin undergo pyrolysis at different temperatures. At first all three of these main constituents require heat to begin pyrolysis. Then later in the process, some are releasing gas (exothermic), while another may still yet be requiring heat (endothermic). Problems occur when gases are released at once, overwhelming the careful mix of gas and secondary combustion air. In general we find that between 450 and 600F there are steep climbs in gas production, requiring additional secondary air to maintain a clean burn. We call these “bursts” that generally coincide with the pyrolysis of cellulose. Different species of woods can have differing ratios of cellulose to lignin, therefore, bursts become especially apparent when carbonizing an entire batch of the same species. The strategy to managing the tin-man system lies in anticipating bursts by limiting the speed of the process and adjusting air controls accordingly. Simply put, there are too many variables to provide a solid recommendation for number and size of holes. Consider a mechanism that allows for air adjustments; Mixing species for feedstock, and packing a nice full (but not too tight!) inner drum will also help buffer bursts.
This may sound confusing, but it’s important to recognize the tin man has some advantages: Of the three systems I’ll describe here, the tin man allows for carbonizing wood up to 1 ½” in diameter. To some extent, it allows for some time to step away. It’s a nice way to make good biochar from common yard wastes with the least amount of ash. It’s also allows for a cool down period after finishing – other systems require dousing with water at the end of the process. Of course, we love the simple design and use of junkyard materials.
Some disadvantages: When things go wrong, they can go very wrong. Don’t ever attempt run a DIY tin-man without holes in the inner drum. By now you should understand that heated wood creates char and volatile gases that could explode if not allowed to vent properly. Managing bursts is tricky, and can turn into a messy plume of concentrated wood gases (much stronger than regular smoke) that can be very harmful to your health. Sure, the tin-man can carbonize random chunks of biomass and sticks, but as I said above, it’s best to pack it in tight. This requires a decent amount of feed stock prep time.
That said, we’re happy to share success stories with the tin man. If you’ve found a matrix for hole sizing and/or an appropriate feed stock pairing, then please share. Continue on for a review of the TLUD system and the Kon-tiki open flame method.
The TLUD
We’ve talked a lot about the TLUD before, so I’ll keep it short, and focus on how it compares to the tin man.
It’s another steel cylinder inside a cylinder – but the air and gas flows are much different.
It’s another batch system – fill up the inner cylinder and light on top, but unlike the tin man, the biomass is gasified in a continuous, even ‘pyrolysis front’. No bursting with this one.
Utilizing the heat is built into the design – TLUDs are commonly used as small cook stoves, but can also be scaled up for other heating processes: canning, sterilizing, or even laundry. We used ours last week for boiling down lye crystals from wood ashes.
It requires a consistent size and shape biomass feedstock – it works very well with easily sourced wood chips, nut shells, etc. It won’t work with large chunks of wood or sawdust. Let’s be realistic: unless you have a chipper, it would be a challenge to use this with yard waste.
You have to be present to extinguish the char. Knowing when to extinguish the char takes some practice – too soon and you may end up with not yet fully carbonized (torrefied) wood on the bottom of the column, too late and the char becomes ash.
Plans are widely available – stay close to the dimensions of the Champion TLUD, use dry feedstock and you’re almost guaranteed clean burn with very high quality biochar.
Kon-Tiki Cone Kiln
The Kon-Tiki (or it’s cousin, the ‘Oregon Kiln‘) are unique among small, ‘backyard’ biochar systems: the truncated cone (or pyramid) design with open top is an oxygen limited container that allows for relatively clean biochar production, while still maintaining the primal feeling of working an open fire. The secret is in the upward and outward sloping walls of the kiln, that force secondary air to build up pressure as it rises toward the top edge. Upon cresting the lip of the kiln’s top edge, the low pressure zone on the fire side pulls in preheated air in a (sometimes dramatic) swirl pattern, thoroughly mixing air and fuel rich pyrolysis gases.
Start a small fire in the bottom of the inside of the cone. After the fire is well established, add sticks and brush on top of the open flame. The idea is to keep top barely burning in this oxygen limited environment, where gases are fully combusted at the top edge where secondary air mixes in. As the top layer of wood burns down to coals, add more wood on top, paying close attention to cover all exposed charcoal with sticks. Expose the charcoal to air for too long and you’ll get more ash. This is easier than it sounds; and indeed, the creators of the Kon-Tiki kiln at the Ithaka Institute can explain it much better than me. Our experience shows operating a cone kiln requires a bit of nuanced experience in judging feed rate. In our very small 32″ diameter cone kiln we’ve been able to cleanly carbonize dry sticks up to (and possibly larger than) 2″ in diameter.
We fabricated our small cone kiln from a single (scrapyard sourced) 3’x5′ sheet of 22 gauge stainless steel. Though this system requires a bit more oversight, we enjoy the feeling of standing around a carbon sequestrating campfire.
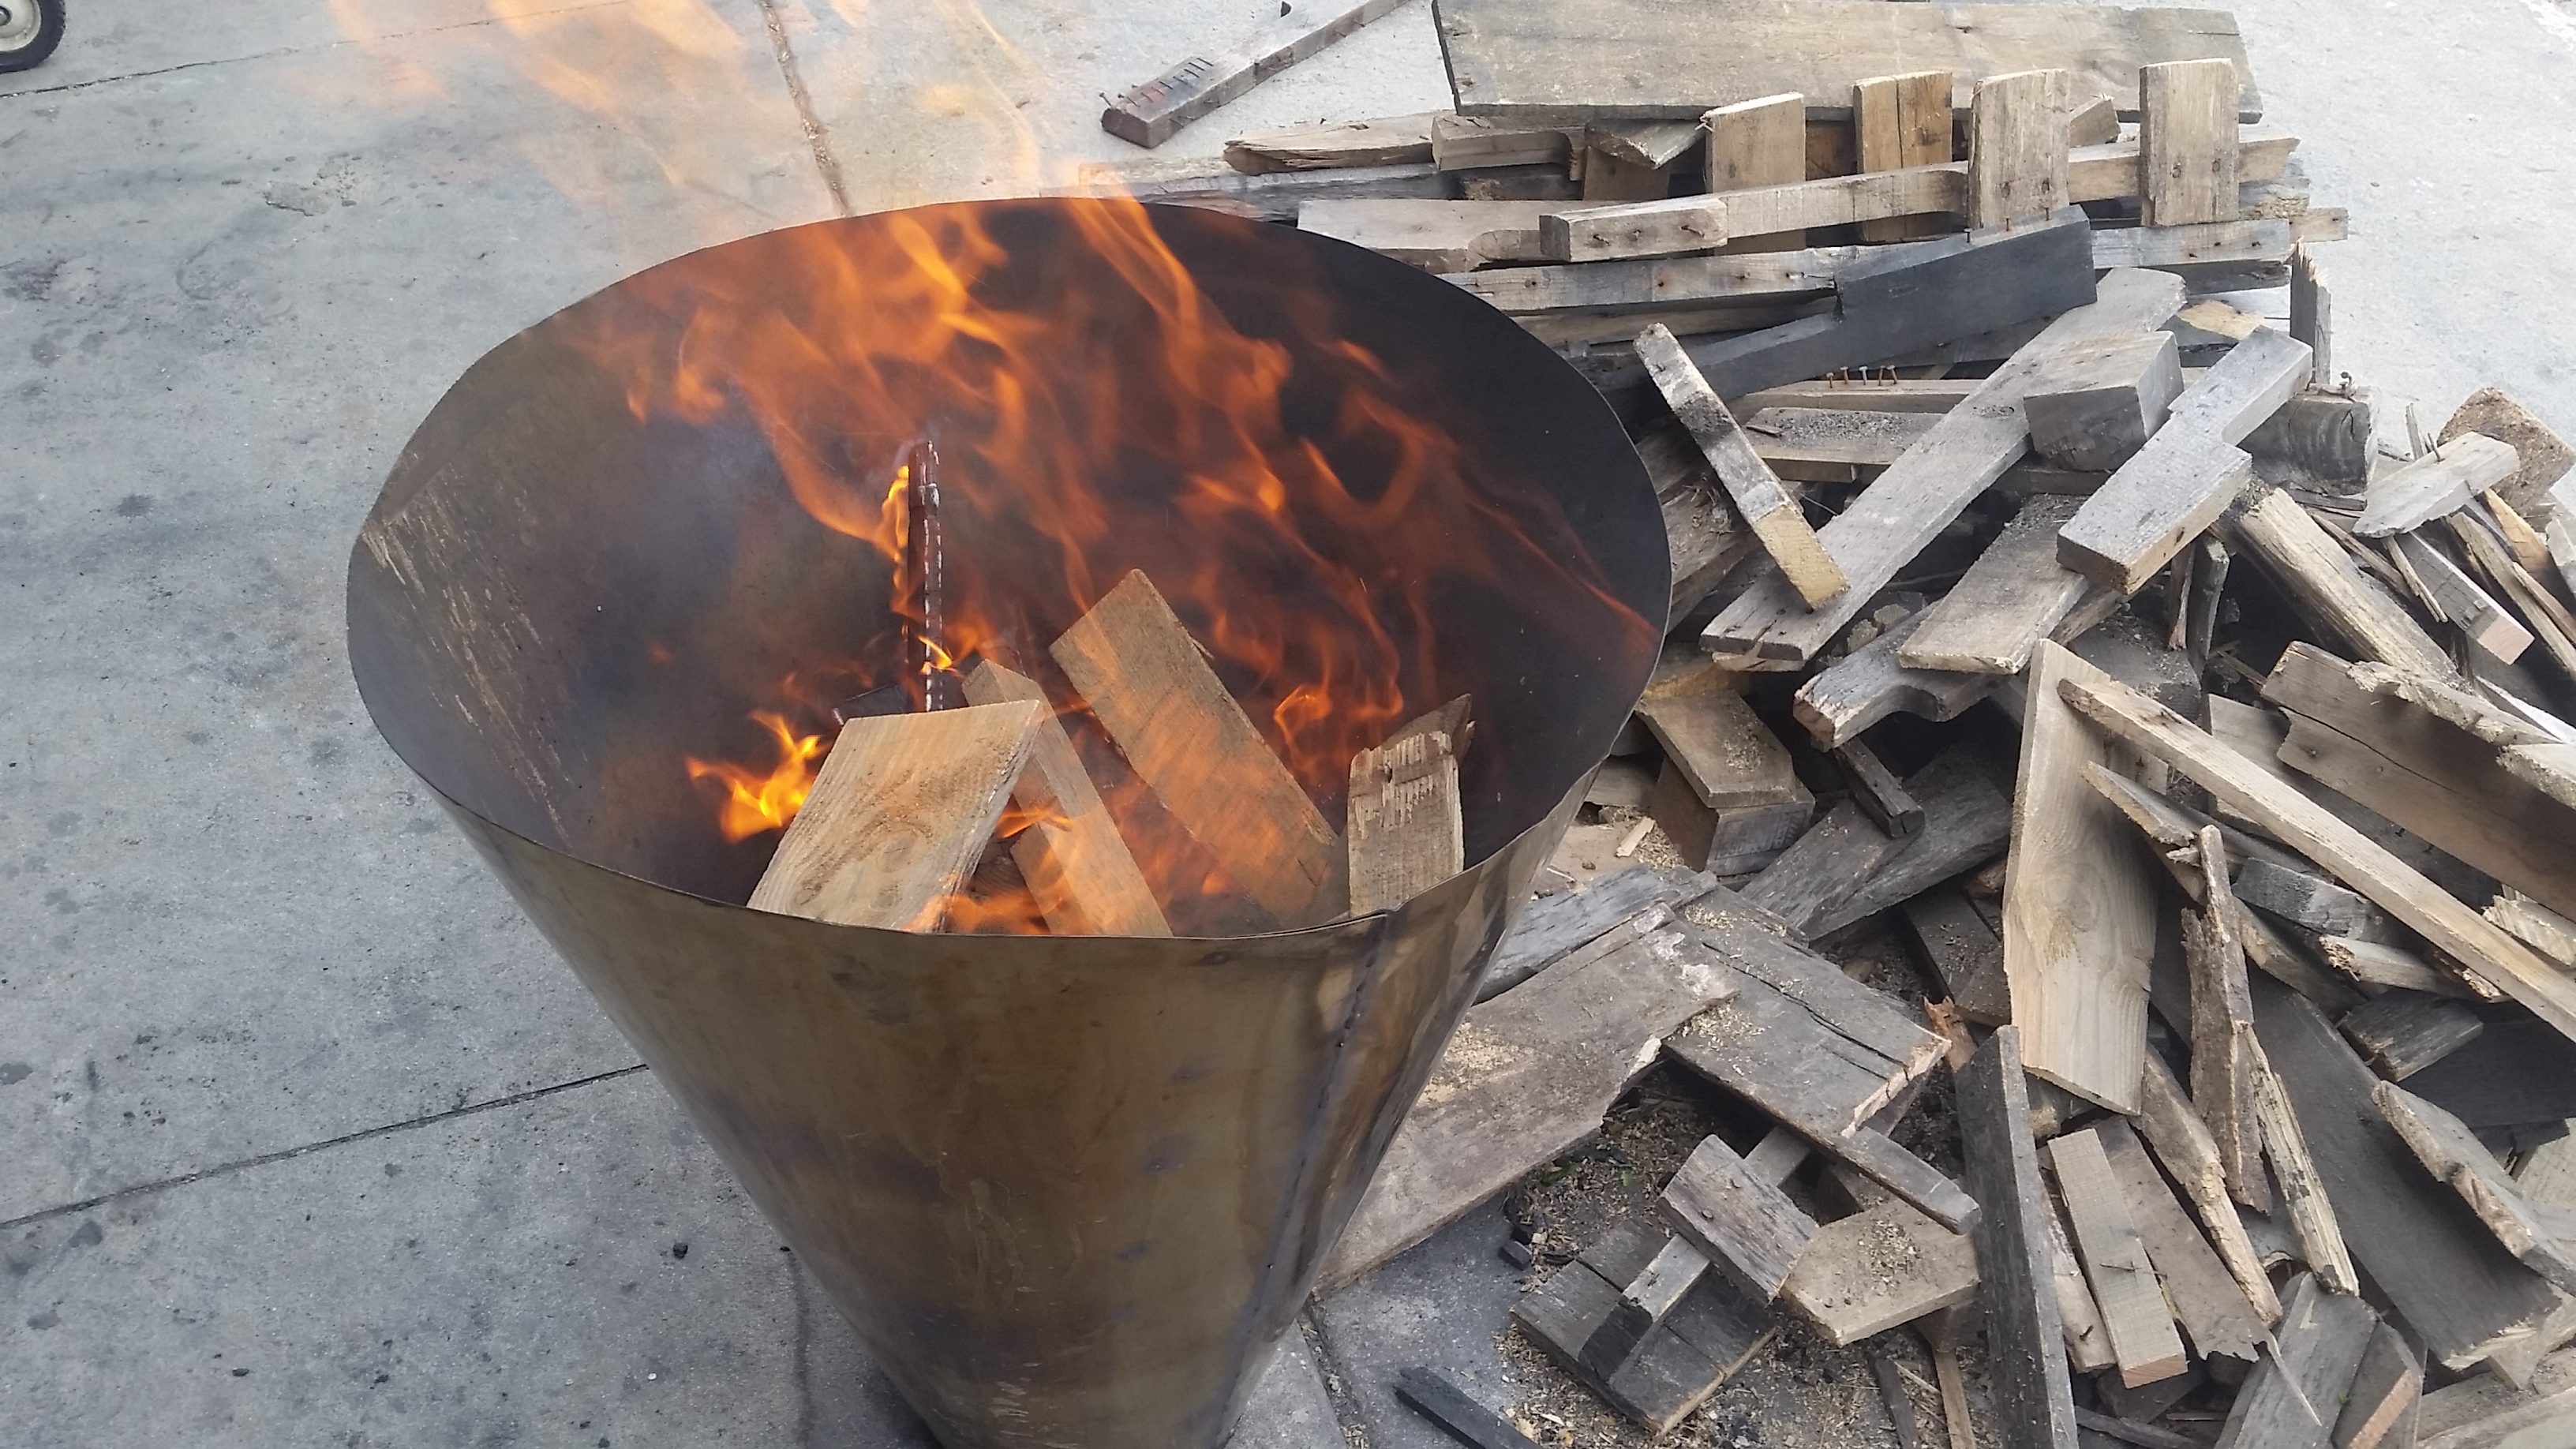
We had a huge pile of pallets that are beyond repair; a cone kiln is a nice way to manage this kind of waste while making good biochar.
Comparison
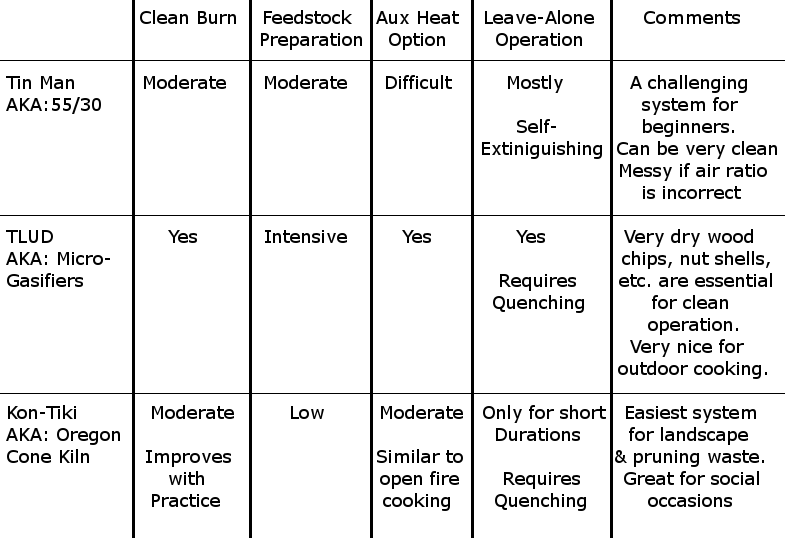
From pit methods to continuously operated automated systems, there are so many ways to make biochar, each with its own appeal. For me, advocating for small scale biochar production is about identifying the technology that takes the least effort with the cleanest burn. For instance, a TLUD boasts a very clean burn, high quality char and adaptive cooking design, but can be very intensive on feedstock preparation without equipment. Feedstock preparation is a perennial problem with biomass energy systems: the systems with labor and energy intensive feedstock preparation (predictable size, shape, moisture and density) are the simplest to manage. The Kon-Tiki offers a means to char sticks and limbs with very little preparation, but requires oversight throughout the process. The tin-man style designs can work, but not without careful feedstock preparation and some control over the process.
If you’ve made it this far, thanks for your work. You know by now that biochar produciton can be a powerful way to capture carbon and improve soils, but it shouldn’t be done at the expense of your (and your neighbor’s) health and well-being. Careful consideration in selecting the right system will go a long way in sustaining your biochar operation. As always, send us an email if you want to share your experience.